Correct digital impression taking - complicated or quite simple?
Let's be honest: Who hasn't sat in front of an implant case and asked themselves how they are supposed to finish the whole "mess" digitally now? Of course, in the desired material, with the available technology and, above all, in the given time. And so it begins, the myth of the simplicity of digital dentistry.

Of course, implant cases have always been the supreme discipline in the laboratory, even in conventional - i.e. analogue - form. But with digitalisation, the complexity has increased considerably. Let's take the production of an implant model as an example. The dentist has taken a digital impression and now wants to receive the restoration including the model from the laboratory. Whereas previously everything was quite simple with a transfer key and the fabrication of a plaster model, the laboratory is now faced with the following questions: -Which scanbody (system) was used to take the impression? -Which software does the dentist/laboratory use? -Do I have the appropriate libraries in the laboratory? -Are there any model analogues for this? Building blocks of digital processes Perhaps the most important step before the actual fabrication of the implant abutment is to consider which production method and in particular which software should be used for the design. It is often not uncommon for the laboratory to ask how to proceed with the scan file sent by the dentist.
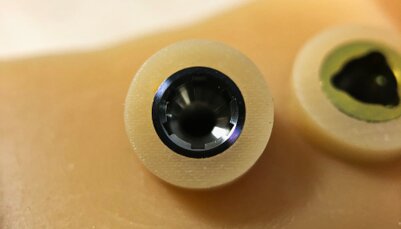
The "matching" scanbody
As the saying goes: precision begins before the first step! Therefore, the digital workflow also starts with the use of a scan body, which is essential for transmitting the exact implant position. However, the practical test shows that it is precisely the handling of the scan data transmitted from the practice to the laboratory that has the greatest potential for error. One possible source of error can be found in the selection of the intraoral scanbody to be used. Because this decision ultimately opens up the possible playing field of constructive paths. The scanbody is of course elementary for the correct fit of the subsequent implant abutment. In particular, it must be ensured that it is seated without gaps during the scan and is not impaired by mucosa or other impurities. If an intraoral impression is taken, it is also important to ensure that the correct scanbody is used. The practitioner should also ensure that all areas required for subsequent processing are digitally captured in order to avoid problems later on during the fabrication of the implant model.
Finding the right interface
Once scanned, the question is: what happens next? As a rule, the scan can be transferred via the various cloud-based services of the chairside providers. Alternatively, the transfer would also be possible by other means - however, one should be aware of what is to happen to the scan later. Not every system is compatible with all scanbodies - for example, further processing of Dentsply Sirona scanbodies can only be done in the Dentsply Sirona software. The CAD software offers of the common open manufacturers, such as exocad or 3Shape, have the option of importing so-called "implant libraries" from a wide range of suppliers. Other software offers, such as Dentsply Sirona, are limited to the hard-coded implant providers and systems. However, the large selection of open systems can quickly become overwhelming if one is not familiar with them. In figures, this overload can result from the selection of over 87,000 components in more than 5,000 implant libraries offered by exocad alone.

The right model choice
If you want to produce precise digital models, commercially available analogues are not suitable for use because of their retentive geometry for fixing in the plaster model. Here it is necessary to check which analogue can be used. Either the analogue of an implant manufacturer or one from the range of a third-party supplier such as Elos Medtech with the Elos Accurate® Analogue for Printed Models (PMA) or nt-trading with the DIM Analogue. The model must then be converted into a 3D model in the so-called Modelbuilder software before the surface impression is taken. The appropriate analogues are then brought in depending on the system. After that, you can continue working on the model.

Making the right choice
The digital world has also significantly increased the complexity of planning. Regardless of which path is taken during implementation, it is always necessary to consider in advance how work is to be continued later. Otherwise, this will result in a consequential error that is difficult to detect and, true to the motto "Shit in - Shit out", will lead to at least unsatisfactory results.

The article was originally published in ZWL Zahntechnik Wirtschaft Labor, Oemus Verlag, 4/2022